
Mixing vocals is one of the biggest challenges for any bedroom producer. You’re limited by equipment, space, and often, experience. Few home studios have dedicated sound booths. Even fewer have the assortment of monitors and headphones necessary for the perfect vocal mix.
At the same time, few things have a bigger impact on your music than the vocals. For better or for worse, vocals are the star of all modern music. Your listeners expect clean, crispy vocals. Offer them anything muddled and tinny and they’ll just skip to the next track.
Does this mean you’re doomed to imperfect vocals if you’re producing at home?
Far from it. As I’ll show in this guide, you can get almost studio-grade vocal mixes by following a few best practices, especially with regards to EQ and compression.
I’ll use Ableton’s stock plugins for this tutorial. However, these principles apply equally to any other DAW or plugins of your choice.
The Vocal Mixing Workflow
As much of an art mixing vocals is, it still follows a few core principles. You comp the vocals before removing pops and clicks. And you add your pitch correction (or autotune) before starting with the EQ.
By and large, your vocal mixing workflow should be as follows:
- Comp the track, i.e. combine the best parts of multiple takes to create a single track
- Delete pops, clicks, and unwanted noises
- Automate gain to make soft parts sound louder – necessary for reducing the risk of over compression.
- Add EQ to remove the unwanted frequencies and amplify the good ones
- Add a deesser to remove harsh sibilants (the ‘S’ and ‘Z’ sounds in words like “ship” and “zip”)
- Add your first compressor
- Add optional effects such as saturation, chorus, etc.
- Add reverb and delay
- Add your second compressor – if necessary
- Add a second EQ to smoothen the mix
While many of these steps are optional, there are a few I consider absolutely necessary. EQ and compression sit at the very top of this list. In fact, you can remove every single effect and still get a solid mix just by using the EQ and compressor properly.
I’ll cover best practices for using these two effects below.
Using EQ Effectively
EQ is the single most powerful tool at your disposal to spark life into your vocal mix. Whether the vocal feels flat or bright, well-mixed or muted, tinny or thick – it depends a great deal on the EQ.
EQ is a hard tool to master. While there are a few guidelines for using it, much depends on the other instruments in the track, the genre, and the “vibe” that you’re going for. More than any tricks, the best weapon in your arsenal is experience. The more tracks you mix, the better trained your ear will be to use EQ.
With that out of the way, let’s take a better look at this powerful tool.
Three Ways to Use EQ
EQ is used three ways in vocal mixing:
- Surgical EQ: This is where you use EQ as a “surgical” tool to remove any unwanted frequencies, hisses, rumbles, and other annoyances from the vocal track.
- Tonal EQ: This is where you set the tone of the mix by amplifying or cutting certain frequencies. For instance, boosting high-end and mids creates the signature pop tone.
- Mix EQ: The final method is to use EQ to help the vocals sit in the mix better. This is done by making room vocals for other instruments, or cutting frequencies in other instruments for the vocals.
Ideally, you’ll follow this workflow:
- Create an initial EQ to surgically cut out all offending noises
- Add a second EQ after your initial effects to get the tone you want
- Add a final EQ to the complete vocals or other instruments to help the vocals sit better in the mix
Remember that there are no fixed rules – you can add a dozen EQs if you want. But at the very least, you’ll want to use two EQs to get a polished sound.
Let’s briefly cover these three EQ approaches below.
Start With Surgical EQ
Start your EQ processing by removing all offensive and annoying frequencies.
The easiest way to do this is to:
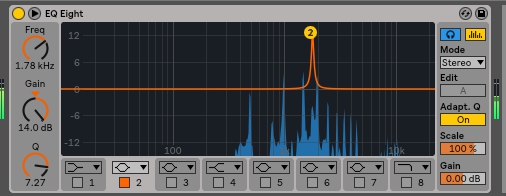
- Use a bell-curve filter with a high Q
- Sweep the filter around and listen for any harsh or unwanted sounds
- Dip the curve and adjust the Q
- For better control, turn on headphone monitoring
If you’re using Ableton, use this image as a reference. The process should be the same for any other EQ as well:
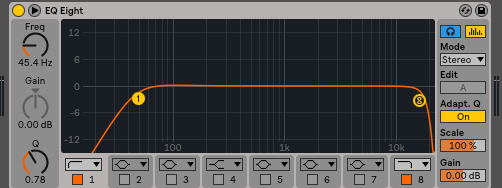
Another common tactic is to cut out extremely low and high-end frequencies. This helps the mix “breathe” by giving room for the bass and kick. It also helps cut out the low rumbles and shrill highs during recording.
Use a low cut and high cut filters to accomplish this as shown below:
Adjust the Tone
Your next EQ should amplify or suppress different frequencies to get the tone you want.
This is a very subjective exercise and will depend entirely on the sound you’re going for as well as the recorded track. Genre conventions also come into play here. Rap vocals, for instance, have a stronger low end than pop vocals (which tend to be brighter).
There are two general rules that work well for most tracks:
- Use a bell filter to boost frequencies around the 100Hz mark
- Use a high shelf filter to boost frequencies around the high-end
See the image below as a reference:
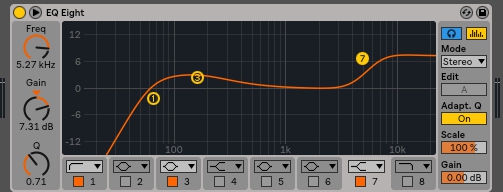
This should give you a good base. You can then amplify specific frequencies based on your preferences. Use the sweeping technique I shared earlier with the bell curve, but this time, amplify frequencies instead of suppressing them.
Make Room in the Mix
Have you ever recorded a track where the vocals felt like they were sitting “above” the track?
This is a common challenge faced by amateur producers. Their vocals sound great solo but don’t gel in with the rest of the mix.
Usually, this happens when you’re EQing the vocals independently of the track. There isn’t enough space in the vocals to accommodate the instrumentals and vice versa.
Since modern mainstream music is all about the vocals, I suggest starting with the instrumentals. Your goal should be to make space in the instrumentals for the vocals.
The spectrum analyzer is a great tool to figure this out. Place it on your vocals as well as your instrumentals. Try to see the general shape of the vocals – what frequencies stand out? What’s the meaty part of the vocals that you want to shine?
Then do the same for your instrumentals. Your goal is to find areas that overlap, then use EQ to cut those areas in the instrumentals to make room for the vocals.
For example, in the track below, the instrumentals peak around the 450-600Hz mark.
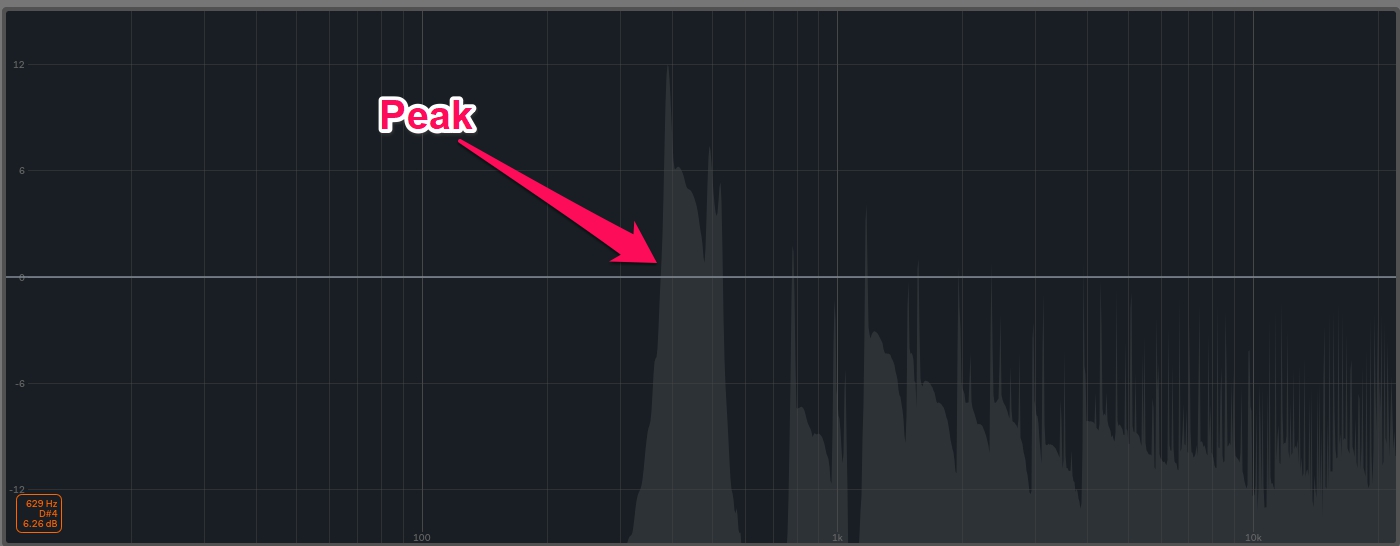
If I want the vocals to stand out and gel with the mix, I would need to EQ the instrumentals around this frequency range. Not a huge cut – just a minor dip so that the vocals can shine through.
As important as EQ is, it can’t make you sound good by itself. You also need another key ingredient – the compressor.
I’ll cover compressors and how to use them in the next section.
Getting Started With Compression
Compression, as the name tells you, is a way to compress an audio signal so that the peaks are flatter and the troughs sharper. The compressor is what makes any signal sound “tight” and consistent.
Compression, like EQ, is a vastly important ingredient in creating a good mix. From the tone to the overall “smoothness” of the vocals, everything depends on this tool.
Working with a compressor can be tough, especially if you’re new to production. It’s not always easy to spot how minor changes in, say, the attack or release can affect the mix. A good set of monitors certainly help, as does a treated room.
My compression approach for casual mixing is to use a minimum of two compressors. I’ll often add a third one to “glue” the entire mix together.
Let’s cover this in more detail below.
Understand the Basics
Threshold, attack, release – before we get started, we need to make sure you understand the parts of a compressor.
Most compressors have the following settings:
- Attack: Usually expressed in milliseconds (ms), the attack time decides how quickly the compressor engages and “attacks” the volume of the audio. Fast attack times make the audio sound more controlled, while slower attack makes it sound punchier.
- Release: Also expressed in milliseconds (ms), the release time decides how fast the compressor is disengaged. Once the compressor is disengaged, i.e. released, the audio goes back to its normal volume.
- Threshold: The threshold, expressed in decibels (dB), determines the volume at which the compressor becomes active. A lower threshold means that the compressor is more active and thus, the audio is more compressed. A higher threshold means lower compression.
- Ratio: The ratio (usually expressed as multiple ratios of 1, like 2:1 or 1.5:1) determines the magnitude of volume reduction. For instance, if your ratio is 2:1, it means that for every 1dB of volume, 0.5dB (½) of audio comes out of the compressor. A higher ratio means stronger compression.
- Gain or Makeup Gain: This setting allows you to increase the volume of the output to makeup (or “gain”) for the loss of volume due to compression.
- Knee: This setting ranges from 0 to 1.0. The closer you get to 1.0, the “softer” the knee. A soft knee makes the compression sound more subtle. A “hard” knee (i.e. close to 0.0) makes the compression aggressive and, well, hard.
On Ableton’s stock compressor, you can see these settings as follows:
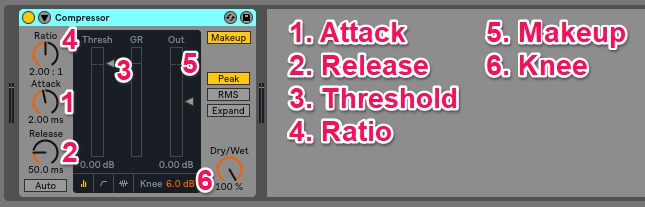
Keep these terms in mind – we’ll use them in the next section.
Three Ways to Use Compression
New producers have a tendency to over-compress their vocals. While over-compressed vocals can feel like they are “tight”, they also feel unnatural and almost auto-tuned. Unless you’re deliberately trying to achieve that effect, my advice is to use two or even three compressors with more subtle compression.
First Compressor
In any raw recording, the dynamic range of your vocals is usually all over the place. Some parts will be too loud, some too soft.
The first compressor, thus, is meant to give you some control over your vocals’ dynamic range. This will help your vocals feel more consistent and better aligned with the mix.
Since you’re trying to control the dynamic range with the first compressor, use the following settings:
- A fast attack – below 5ms
- Fast release – below 25ms
- A high ratio for stronger compression – aim for anything between 2.5:1 to 4:1
- A hard knee – between 0.2 to 0.3 – for stronger compression
In Ableton’s stock compressor, this would look something like this:
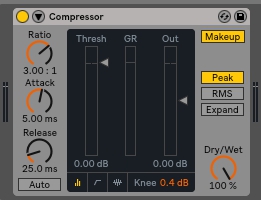
Play around with these numbers until you get a smoother, more consistent mix.
Second Compressor
The second compressor is where you start shaping the sound of the instrument. Thus, the compression will be more subtle with a strong focus on adding punch and excitement to the audio.
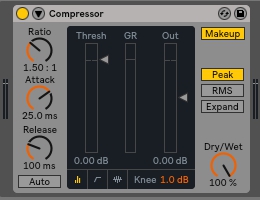
Play around with the settings, but in general, the following work well:
- Slow attack – above 15ms. This will add punchiness to the vocals.
- Slow release – aim for 100ms and up. This complements the slow attack and adds punch to the mix.
- Softer knee (closer to 1.0) for more subtle compression.
- Lower ratio (between 1.5:1 to 2.5:1)
Use these settings only as a guide – the exact numbers will depend on your track, vocal style, preference, and genre. Play around with the makeup gain and threshold until the vocals sound loud enough.
Here’s what it would look like in Ableton:
While you can use your stock compressor, I highly recommend investing in some analog compression plugins like CLA-2A or CLA-76. Using them will add a characteristic warmth to your vocals that stock compressors struggle with.
I also like to use a compressor on my master or main instrument channel. I set everything at a medium level (5-15ms attack, 50-75ms release) to help glue all the sounds together.
Final Words
We’ve just about touched the basics of EQ and compression. These are complex topics with a great deal of audio science behind them. There are entire university programs dedicated to audio engineering.
Keep in mind that what you hear on the radio was recorded in expensive studios by producers and audio engineers with million-dollar equipment and decades of experience. You can’t really beat them. Your goal is to sound better, not better than radio.
Hopefully, these tips will help you get started on that journey!
About the Author
Ryan Harrell is a producer, part-time DJ, and author who blogs at MIDINation. Besides music, he also loves surfing, the city of San Diego, and traveling.
Discover more from Stan Stewart - @muz4now
Subscribe to get the latest posts sent to your email.